Commercial & Residential Electricians in Mesa AZ.

480-434-0777

How To Install A GFCI Outlet

Do you have a question about a GFCI outlet installation? You can consult with our in-office electrician in Mesa AZ free of charge. Voted best electrician Mesa AZ and having over 30 years of experience, he will answer all of your questions about installing GFCI outlets, wiring a GFCI outlet or replacing a GFCI outlet. Our in-office electricians in Mesa are available to assist you Monday thru Friday, between 8:00 AM and 5:00 PM. Give them a call today, you will be happy you did.

Before Installing A New GFCI Outlet

Before getting started there are two important things to take into consideration.

First, what do you plan on using the GFCI outlet for? Having a reasonably good idea of what you are planning on plugging in will tell you how much power will be required. Knowing how much power you anticipate needing will determine if an existing circuit can be tapped into or if a new circuit will be required from your panel. A 15 amp circuit has 1800 total watts of power available and a 20 amp circuit has 2400 total watts of power available. Remember to account for the power demand of existing devices utilizing the same circuit if you are thinking about tapping into an existing circuit.

Second, will the GFCI outlet be used inside or outside? Exterior GFCI outlets will need weather proof covers in all cases and exterior rated outlet boxes are required if the outlet electrical box is surface mounted, opposed to being recessed in a wall.
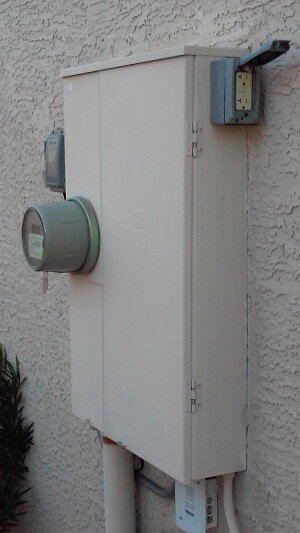
How to install a new GFCI outlet on a main electrical panel

How To Install A GFCI Outlet Outside With A Dedicated Circuit

Utilizing a dedicated circuit is the best method for installing a GFCI outlet outside because it completely separates the new exterior power from the existing interior power. The advantage is that if something outside becomes wet and trips the GFCI outlet or the circuit breaker, it will not affect the outlets inside your home.

The easiest and most cost effective way to do this is to mount the GFCI outlet directly on the side of your circuit breaker box as shown in the image above. GFCI outlets can be located up high or down low depending on your needs. These outlet installations work great for Christmas lights, landscape lighting and watering time clocks.

Information about how to add a GFCI outlet

Tools Needed:

  • Battery powered drill
  • 13/64 metal drill bit
  • 7/8 inch hole saw
  • Channel lock pliers
  • Slotted screwdriver
  • Phillips head screwdriver
  • Wire strippers
  • Voltage tester
  • Pocket knife

Materials Needed:

  • Cast aluminum weatherproof box (single gang with 1/2 inch threaded hubs)
  • Two 10-24 x 3/4 inch machine screws with 2 nuts and lock washers
  • 1/2 inch chase nipple
  • Weather resistant 15 or 20 amp GFCI outlet
  • 15 or 20 amp single pole circuit breaker
  • Black, white and green THHN solid wire (#12 wire for 20 amp or #14 wire for 15 amp)
  • Weatherproof cover

*Note: For dedicated GFCI outlets in other locations, it is best to contact our electricians because electrical conduit will need to be installed. In some cases, wiring will also need to be installed through your attic.

Step 1: Turn off the main circuit breaker in the panel
  • This should shut off all of the power in the panel after the main circuit breaker. Keep in mind that the power before the main circuit breaker is still live and can only be shut off by the electrical utility company.
  • Note: Homes with solar power will have an additional circuit breaker that needs to be shut off to disconnect the electricity. The wires attached to this circuit breaker will still be energized even after the circuit breaker is turned off.
  • If you have an older home and no main circuit breaker is present, it is best to call our local Mesa electricians to do the job for you. Most older panels have very limited space and moving around older (sometimes frail) wires will almost certainly be required.
Step 2: Remove the interior panel cover
  • This is the cover located behind the outer door of the panel. It should have the circuit breaker labels on it. Before removing it, make sure there is an empty space for a new circuit breaker. If an empty space is not available it is best to call an electrician because some re-wiring will be required inside the panel to make space for the new circuit breaker. When this cover is removed all of the panel wiring and circuit breakers will be exposed.
Step 3: Confirm the power is off with voltage tester
  • This is the most important step in our “How to Install GFCI Outlets” instructions.
  • Take a reading between both buss bars and also between each individual buss bar and ground. If any electrical power is detected, your main circuit breaker or solar panel circuit breaker is either still on or it is not shutting off properly.
  • If you cannot absolutely verify that your power is off or simply do not know how to verify it for safety, contact our Mesa AZ electricians for help. Serious electrical injury can happen if the power is not shut off.
Step 4: Screw the mounting lugs to new outlet box and fill unused holes
  • Attach the mounting lugs screw into the back of the outlet box in the corners. They are designed to mount the box without compromising the water tight seal of the box.
  • Attaching them kiddy-corner from each other in a vertical position will make mounting easier.
  • Start, but do not completely tighten the grounding screw that goes inside of the box.
  • Plug up all unused holes with the screw-in fillers. Only the back hole should be left open at this point.
Step 5: Mark and drill the hole for the 1/2 inch chase nipple
  • Hold the new outlet box where you want to position it on the outside of the circuit breaker box and mark the back hole and two mounting holes. Make sure all holes are back far enough to clear the interior cover and that the neutral bar is not in the way. Also, gently bend any wires that could get damaged while drilling away from the area. Drilling should be done on the outside of the panel only, never from the inside.
  • Using a 7/8 inch hole saw, drill the center back hole for the 1/2 inch chase nipple.
  • Drill the 2 holes for the 10-24 mounting screws using a 13/64 inch metal drill bit.
Step 6: Insert the chase nipple and mount the exterior rated outlet box
  • Remove any sharp metal remaining attached to the drilled 7/8 inch hole and insert the chase nipple through the panel, screwing it into the new outlet box. Do not tighten it all the way, the mounting screws still need to be lined-up with the holes. Be careful, the metal around the hole will be sharp and very hot after drilling it.
  • Insert and tighten the 10-24 mounting screws (with lock washers and nuts) and finish tightening the chase nipple.

Note: When tightening these mounting screws, leave the slots of the screws in a vertical (up and down) position. This will allow any moisture to run through the slot and help prevent rusting.
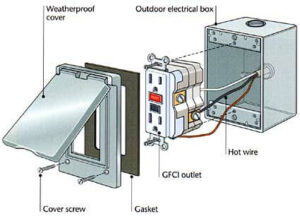
Schematic to put the GFCI outlet into the electrical outlet box and attach the weatherproof cover.
Step 7: Continue putting the GFCI outlet in and weatherproof cover on
  • Take your black, white and green wire and from the inside of the panel, push them through the chase nipple leaving enough wire hanging out of the new outlet box to attach the GFCI outlet.
  • Strip the ends of the wires and attach them to the GFCI outlet using the terminals marked line on the back of the GFCI outlet. See our page about how to wire a GFCI outlet for more details.
  • On the green wire, measure about 6 inches from the outlet and, with a knife, strip about 1 inch of insulation off and wrap it around the grounding screw inside of the outlet new box.
  • Tighten the grounding screw to secure the ground wire inside the outlet box.
  • Gently fold the wires into the outlet box and mount the GFCI outlet by screwing it into the box.
  • Attach the weatherproof cover.
Step 8: Insert the outlet's new circuit breaker and attach the wires
  • Install the circuit breaker into an unused space and cut the black wire leaving enough to attach it to the circuit breaker. Strip the end of the black wire and attach it to the circuit breaker.
  • Cut the white and green wires, again leaving enough to attach them to the ground and neutral bars. Connect the white wire to the neutral bar and the green wire to the grounding bar. In some panels the ground and neutral bar will be the same bar.
Step 9: Put the interior panel cover back on and turn the power on to your new GFCI outlet
  • Remove the circuit breaker knock out from the cover where the new circuit breaker will be and put the interior cover back on.
  • Label the new space on the panel cover “GFCI outlet”. Do this so you will know what that circuit breaker is for and how to reset the circuit breaker for new GFCI outlet if you need to.
  • Turn all circuit breakers back on.

Note: If a circuit breaker will not reset check to make sure that no wires were damage while drilling and that the new outlet wiring is connected properly.

Step 10: Verify that your GFCI outlets are working properly
  • Push the reset button on the GFCI outlet to energize it.
  • Before using it push the test button to confirm that it is functioning correctly
  • Push the reset button again and you are finished.

Dolce Electric Company has scheduled in-office electricians Mesa AZ homeowners and businesses can call and consult with free of charge Monday thru Friday, from 8:00 AM until 5:00 PM. They can assist you with the installation of your GFCI outlet or any other electrical questions you may have.