Commercial & Residential Electricians in Mesa AZ.

Commercial & Residential Electricians in Mesa AZ.
Do you have a question about a recessed light installation? You can consult with our in-office electrician free of charge. Having over 30 years of experience, he has the professional experience that you are looking for with commercial and residential recessed lighting. He will answer all of your questions and provide you with the information that you want. He is available Monday thru Friday, from 8:00 AM until 5:00 PM.


The first step is deciding what size fixtures you want to install. Recessed lights are available in 3, 4, 5 and 6 inch diameters. The most popular size is 6 inch because traditionally it can produce a wider spread of light. This will require fewer fixtures to effectively illuminate most areas.
Smaller fixtures can be used for general lighting but more fixtures will be needed for an even balance of light throughout the area. It’s more common to add smaller fixtures for accent lighting. These are typically used in wall coves or to highlight paintings and artwork.
Size selection is a personal choice that you will make based upon what you feel will best compliment your home.
Each room has a different use that will require more or less light. The number of fixtures used should be enough to adequately light the room. There are 2 terms that you will need to be familiar with to determine how much light and how many fixtures you will need:
Foot-candle:
Light is measured in foot-candles. It’s defined as the amount light that reaches one square foot of a surface area when a single candle is one foot away. It is not a measurement of light produced.
Lumen:
This is a measurement of how much light a fixture produces. Higher lumen output means the fixture will be brighter and lower lumen output means it will be dimmer.
To figure the amount of light needed, you will need to know the square footage of the subject space or room (Length X Width = Square Feet). Using the chart below, multiply the recommended foot-candles per area by the square footage. This is how many lumens it will take to adequately illuminate the space.
Suggested Levels Of Light For Each Room In Your Home
Bathrooms – 75 Foot-candles
Bedrooms – 15 Foot-candles
Closets, Standard – 10 Foot-candles
Closets, Walk In – 20 Foot-candles
Dining Rooms – 35 Foot-candles
Garages – 90 Foot-candles
Hallways – 10 Foot-candles
Home Office – 75 Foot-candles
Kitchen, General Area – 35 Foot-candles
Kitchen Sink – 75 Foot-candles
Kitchen Stove – 75 Foot-candles
Living Rooms – 15 Foot-candles
To figure the number of fixtures needed, divide the total lumens calculated for the space by the amount of lumens each fixture produces. This is the total number of fixtures needed for the space.
Example: A dining room with an 8 foot ceiling, measuring 10 feet by 10 feet, using 6 inch recessed lighting with an output of 940 lumens per fixture, would require 4 recessed lights. (10 feet X 10 feet = 100 square feet) (100 square feet X 35 foot-candles = 3500 total lumens needed) (3500 lumens ÷ by 940 lumens = 3.72 fixtures)
Rarely will the number of fixtures work out to a whole number so it’s best to round up. A little extra light is better than not enough. Dimmer switches can be used in conjunction with your recessed lighting to adjust the light levels.
If you are interested in installing recessed lighting or just have a question about the number of fixtures to install, you can consult with our Mesa electricians for free assistance Monday thru Friday, between 8:00 AM and 5:00 PM.
Now that you have a good idea of how many fixtures you want install, you will need a design that looks great and fulfills your needs. Strategic recessed lighting placement and consistent recessed lighting spacing will greatly impact the overall appearance and functionality of your installation. It should be without glare or shadows. It is not uncommon to spend more time with the layout than the actual installation. Obstacles in and above the ceiling that may interfere with the fixture’s installation must be accounted for. Possible obstacles include duct work, plumbing pipes, fire sprinkler pipes, existing electrical wires and smoke detectors.
Our electricians in Mesa AZ can design a layout while providing you with a free estimate to do the job.

Tip:
If you are replacing existing lights with new recessed ceiling lights try to have your layout encompass the hole in the ceiling where your existing lights are currently wired. This will save you the time and expense of repairing your ceiling. Contact our Mesa electricians for additional helpful electrical tips.
Have you decided on an object or place in the room that will require a recessed light fixture directly above it? Have you decided on an object or place in the room that will require a recessed light fixture directly above it? If so, this is the focal point that you will probably want to base the placement of your recessed lights off of. If kitchen recessed lighting is what you’re installing, this could be the sink. If bathroom recessed lighting is being installed, your focus might be a mirror. Regardless of what your focal point is, this is the first light that should be centered and all additional fixtures should be symmetrically placed off this benchmark.
If you do not have a focal point, the placement of your recessed lights will most likely be balanced off the center of the room.
Fixtures should be far enough from your walls to avoid “hot spots” but close enough to avoid dark spots. Corners should be bright, dark corners cast the illusion of a lower ceiling and visually shrink the room.

Tip:
If you have or are planning on putting a ceiling fan in the room make sure that your recessed lighting placement is far enough away to eliminate any shadows. A good design or layout will not cast the illusion of a helicopter flying overhead. Contact our in-office electricians in Mesa for more helpful electrical tips about recessed lighting and other electrical projects.
Getting the spacing of the recessed lights just right can make or break your design. If the lights are too close together, the area will be over-lit with glare and look washed out. If they are too far apart there will be dark shadows and bright circles on the surface below.
Spacing will depend on the height of your ceiling and the beam angle of the fixtures being used. The chart below will give you the surface light circle diameter for a specific beam angle at a given ceiling height.
Surface Light Circle For Beam Angle And Ceiling Height
15° Angle
30° Angle
45° Angle
60° Angle
90° Angle
120° Angle
8 ft Ceiling
2.1 ft Circle
4.3 ft Circle
6.6 ft Circle
9.2 ft Circle
16 ft Circle
27.7 ft Circle
10 ft Ceiling
2.6 ft Circle
5.4 ft Circle
8.3 ft Circle
11.5 ft Circle
20 ft Circle
34.6 ft Circle
12 ft Ceiling
3.2 ft Circle
6.4 ft Circle
9.9 ft Circle
13.9 ft Circle
24 ft Circle
41.6 ft Circle
14 ft Ceiling
3.7 ft Circle
7.5 ft Circle
11.6 ft Circle
16.2 ft Circle
28 ft Circle
48.5 ft Circle
16 ft Ceiling
4.2 ft Circle
8.6 ft Circle
13.3 ft Circle
18.5 ft Circle
32 ft Circle
55.4 ft Circle
18 ft Ceiling
4.7 ft Circle
9.6 ft Circle
14.9 ft Circle
20.8 ft Circle
36 ft Circle
62.4 ft Circle
Spacing should be figured so the light circles overlap each other. This will prevent dark spots on the surface below.
Every fixture has a maximum spacing criterion. This photo-metric data is a ratio for figuring the maximum recommended distance between fixtures. It’s a number, typically between 1.5 and 0.5 that gets multiplied by the ceiling height to get the maximum recommended space between fixtures. This spacing should never be exceeded.

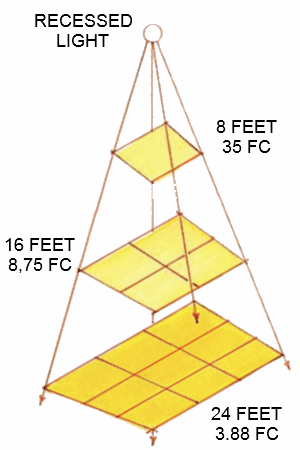
Brightness diminishes rapidly over distance. For a simple understanding of this, shine a flashlight on a wall and start moving backwards. As the distance from the wall increases, the circle of light gets bigger but it also gets dimmer. This weakening brightness on the surface is called fall-off and it’s calculated in accordance with the inverse square law. It states that the brightness on a surface weakens at a ratio comparable to the distance between the surface and the fixture squared.
In this example diagram, the surface at 16 feet below the fixture is just one fourth as bright as the surface at 8 feet. This is because the illuminated surface area, at twice the height, is 4 times larger. The surface at 24 feet below the fixture is just one ninth as bright as the surface at 8 feet. This is because the illuminated surface area, at 3 times the height, is 9 times larger.

Tip:
Using a stud sensor will tell you where the joists are but you can also poke a small hole in the ceiling, dead center of where you are planning to place each fixture, and probe above for obstructions. Bending a coat hanger at 90 degrees {around 4 inches in length} and probing up and down in a circular motion will tell you if anything is in the way before cutting your ceiling holes. This will confirm that your recessed lighting placement will work without any problems.
If you have a question about recessed lighting, or installing any other lights, you can consult with our Mesa electricians free of charge. We schedule an in-office electrician in Mesa with over 30 years of experience Monday thru Friday, from 8:00 AM until 5:00 PM. He will answer all of your questions and provide you with the solutions you’re looking for.
Dolce Electric Co has been installing recessed lights since 1999. Our electricians have installed thousands of recessed can lights in homes and businesses throughout the valley. All of our electrical work is guaranteed parts and labor for life and free estimates are always offered. Give our in-office electrician in Mesa AZ a call today during office hours; you’ll be happy you did!
Dolce Electric Co
625 W Southern Ave E239,
Mesa, AZ
85210
Mon – Fri 8:00AM to 5:00PM
Sat – Sun: 8:00AM to 3:00PM